What is mastering:
How to master a song
By Brian Jackson
Loudness. Punch. Impact. Width. All of the aforementioned terms are associated with desirable subjective sonic characteristics of a finished production. While they can be created at any stage of the production process, often, it is during modern mastering that they are enhanced or even created.
Definitiion: mastering is the final step in the music production process, and is the last opportunity to make changes to your song before it goes out to the world. Here, the master copy is created from which all other copies are made. It is preceded by mixing and followed only by manufacturing (for vinyl, CDs, etc.) and distribution.
Compared to mixing: generally speaking, mastering involves working with one stereo audio file per song. Some creative changes can be made along with enhancements, but the mastering engineer has limited options due to the constraints of working with a stereo mix.
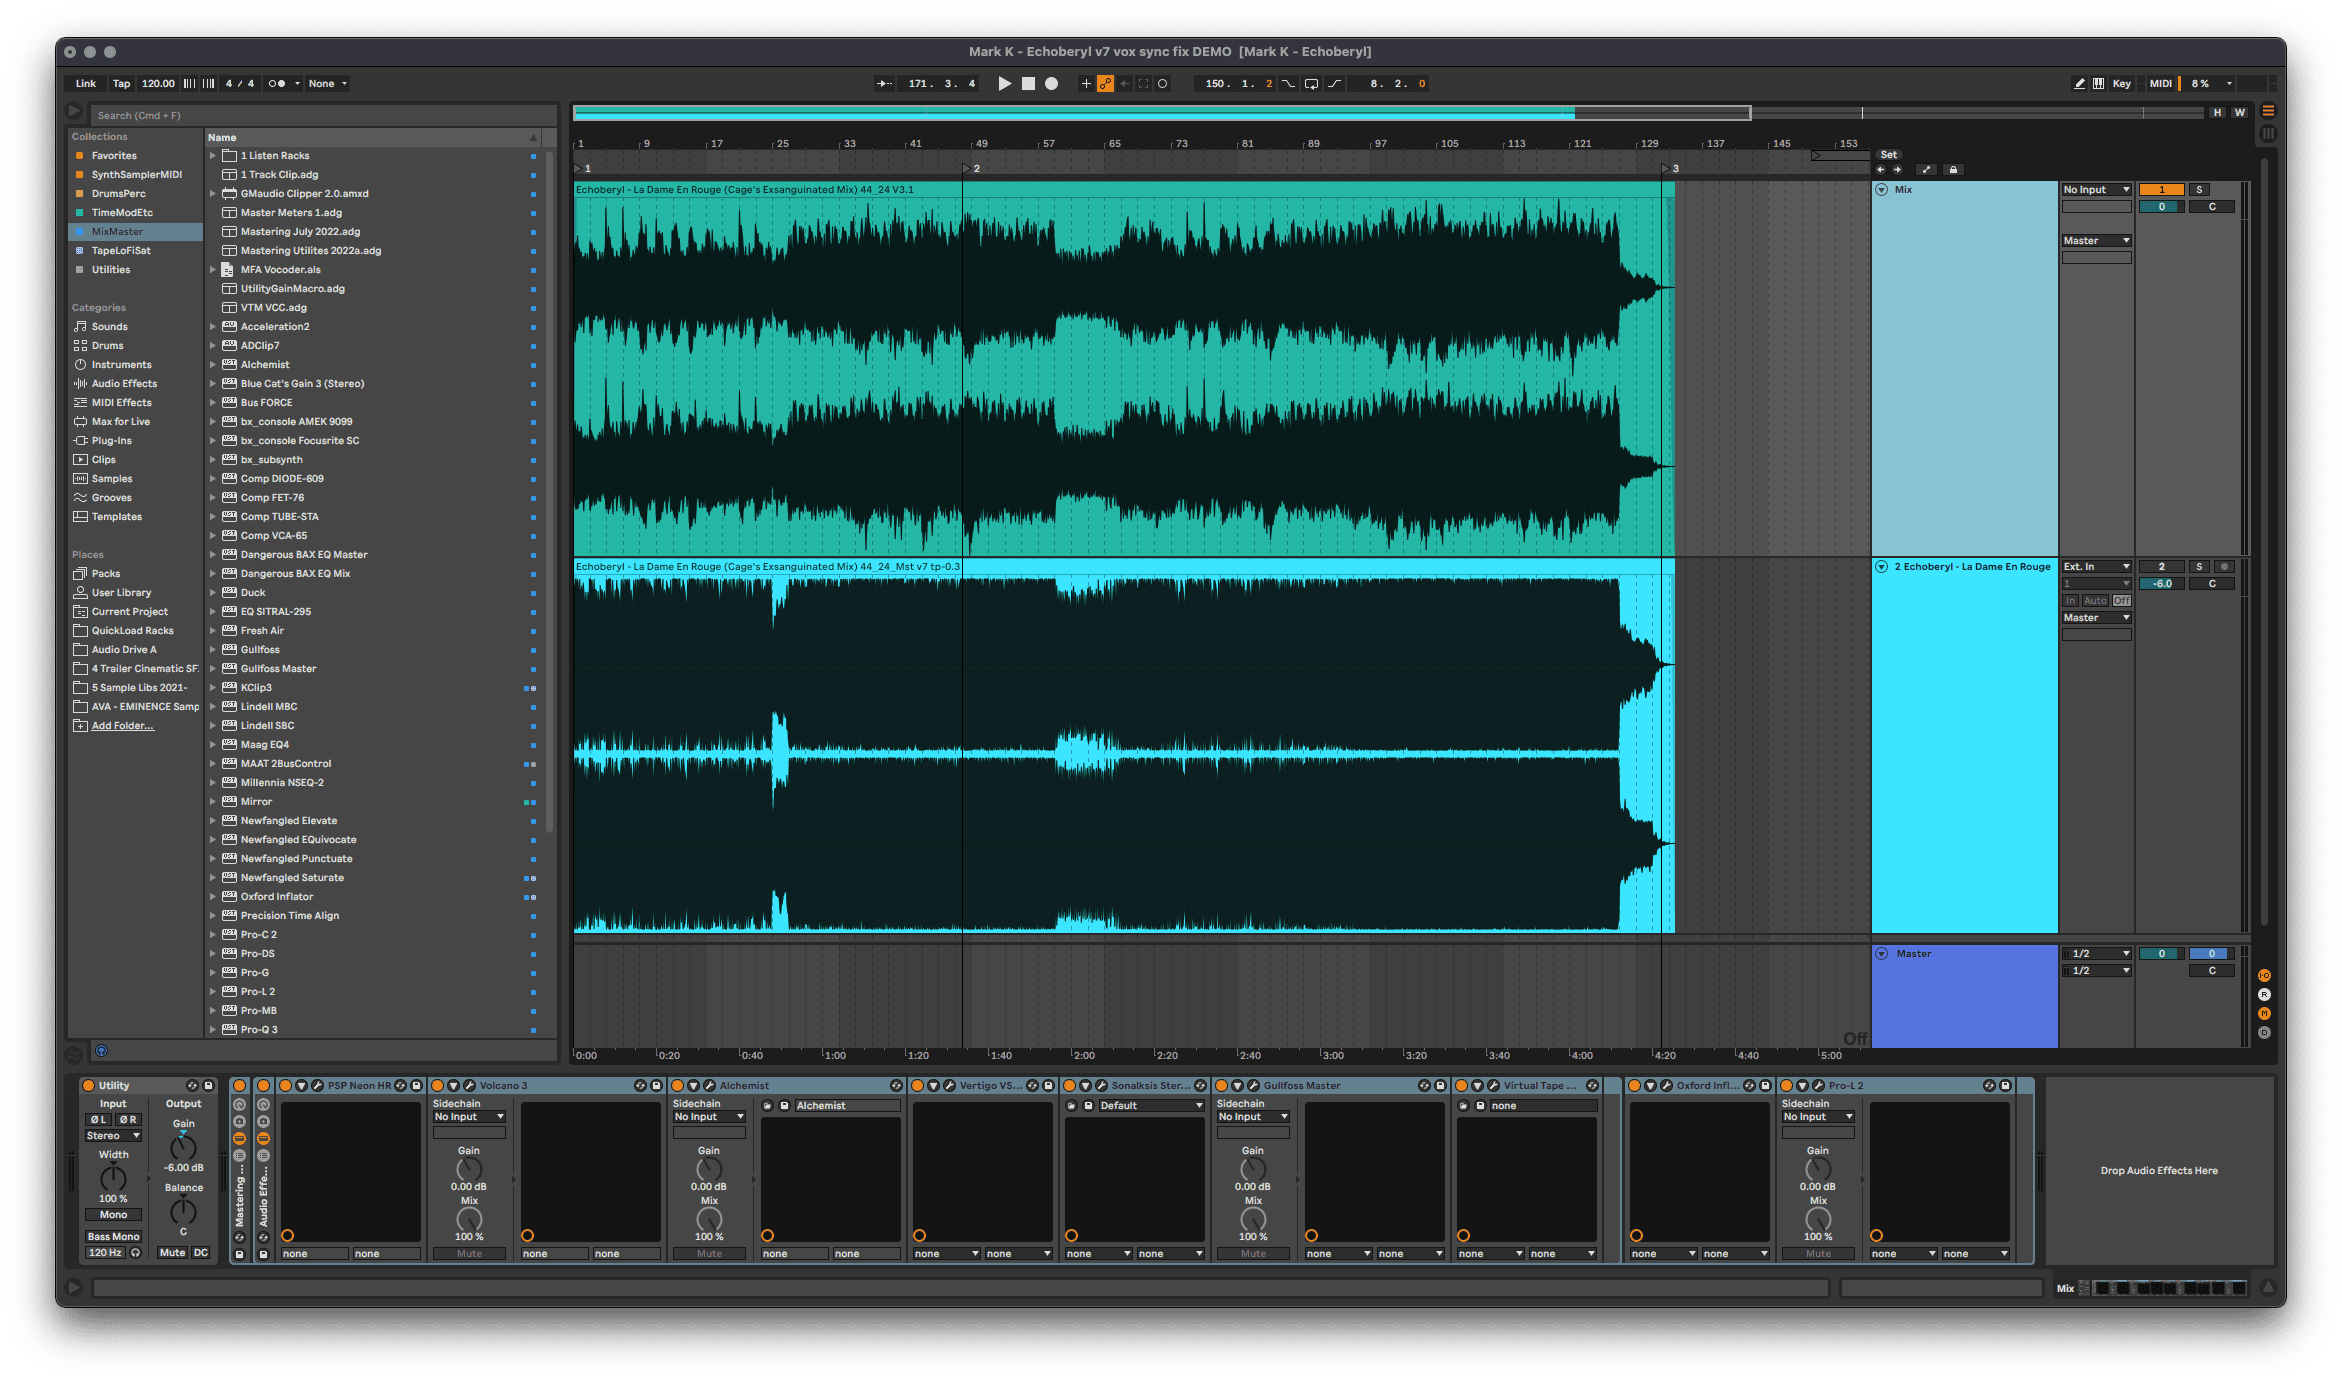
Mixing involves working with all of the individual recordings and performances in a session. It often includes dozens or even hundreds of mono and/or stereo sources that are mixed down to one stereo audio file. Compared to mastering, mixing is a lengthier and more elaborate process, in part due to the number of decisions that need to be made by the producer and mixing engineer.
Brief history of mastering
The mastering engineer’s job is to create the master copy that all other copies are created from. For many decades music was mostly released on vinyl. Back then their job consisted mostly of transferring the audio from each mix’s 2-track tape to the master lacquer disk used to create the metal stamps that pressed the records. Thus they were known as a transfer engineer.
When consumer tape formats, and later CDs, became the standards engineers continued to do the same basic tasks with the new technologies. As the industry and tools evolved engineers increasingly processed the audio before the transfers occurred in a step known as pre-mastering. Today what we call mastering was traditionally known as pre-mastering.
Goals of mastering
The goals of mastering can vary from genre to genre and format to format, but in all cases they include the following:
Catch and fix problems – a crucial role played by the mastering engineer is quality control. This is the last chance to remove noise such as hiss, clicks, and unwanted distortion. It is somewhat common to request revisions from the mix engineer when the problems and/or other desired changes are best addressed in the mixing session.
Sonic enhancements – here the mastering engineer will commonly apply EQ, compression, saturation, and limiting, among other processing. The amount of processing done varies wildly from genre to genre. For example, a mastering engineer might do little to nothing on a well recorded and mixed acoustic folk or jazz song, while they may have to do massive amounts of processing on an amateur production or stylistically appropriate amounts for a modern pop or EDM track.
Consistency – When mastering an album or EP the mastering engineer makes sure the songs are consistent in terms of tonality and loudness, in step with the producer’s creative decisions and appropriate for each song. Once an album starts playing the consumer should be able to set their desired listening volume and not have to adjust it for each song. The mellow minimal song should probably not be louder than the dense club banger. The overall frequency balance should be consistent from song to song insofar as the elements of different songs are similar.
Correct output level and format specifications – a fundamental role of the mastering engineer is to make sure that final output is correct. This aspect includes not only ensuring appropriate levels for the genre and format (i.e., peak and average levels), but also meeting required technical specifications such as sample rate and bit depth (e.g. 48 kHz 24 bit) or bit rate (e.g. 320 kbps) and file format (e.g. WAV, AIF, FLAC, MP3, AAC, etc).
Steps for mastering a single
For this article let’s consider mastering a single. Assuming you are mastering your own song you should export the mix ideally to a 32 bit WAV or AIF, and always at the sample rate you’ve been using up to this point. In a pinch you can add your mastering processors to the mix bus/master track, but it’s not a best practice to do so and can result in complications later on in the process.
4. Use the DAW’s clip/region gain feature to raise or lower the level of the file as needed. Details of this step go beyond the scope of this article, but basically you want to lower the level if there’s not enough headroom for processing and raise it if super low. Starting with a peak level of about -6 dBFS or slightly lower should be ok.
You can also use a basic volume device at the beginning of the chain, such as Ableton’s Utility.
6. Check the heads and tails. Make sure there is an appropriate amount of silence at the beginning and end of the file. Edit the length and add fades as needed so there are no clicks while also maintaining the producer’s creative decisions.
7. Add dither and export the song to the appropriate specifications.
Monitoring Considerations
Monitoring for mixing and mastering is a huge topic well beyond the scope of this article, but there are a few things you should consider.
Unless you have a well-treated room with optimally-placed high-quality full-range speakers, and you know your room well, it’s probably best to primarily work on a good pair of reference-quality headphones. Referencing on your speakers is fine, but relying on them will be problematic.
Products like Sonarworks SoundID Reference or IK Multimedia ARC can be very helpful, but they don’t fix fundamental problems with your room.
Since mastering is the last opportunity to fix problems and make enhancements it is not a good idea to master your song in the same room and on the same monitors where it was mixed.
For example, if your room has a big dip around 100 Hz it is likely that you boosted those frequencies somewhere in your mix. When you master your song everything will sound fine, even though there is too much 100 Hz resulting in a boomy sounding final product.
A good set of headphones can reveal that problem and allow you to make appropriate adjustments.
Listen and reference
How much bass is right for my genre? How loud should my master be?
Using reference tracks well is an artform, but one that everyone should learn. To figure out what targets to shoot for in your selected genre take advantage of the tools out there that make it easier.
Finalizer by TC Electronic is a free website app that offers a lot of useful information.
ADPTR Audio’s Streamliner and Metric AB are excellent tools – and though not free they are often on sale.
Basic Mastering Chain
The basic mastering chain is: EQ – Compressor – Brickwall Limiter

The order of the EQ and compressor might be changed in some situations, but the limiter is ALWAYS last.
Pretty much every modern DAW has the tools you need to get started with mastering. Once you have an idea of what you’re doing, and understand the limitations of your tools, then start researching 3rd party plug-ins.
Start with the limiter
When working in the digital domain it is necessary to use a brickwall limiter for mastering. This kind of limiter has an absolute ceiling above which no signal will exceed. Using a compressor even with its most aggressive ratio and attack settings is not sufficient.
In Live and Logic use Limiter, in Pro Tools use Maxim, and in any other DAW check the reference manual for which stock limiter is a brickwall limiter you can use. There are also free brickwall limiters that you can explore before purchasing popular plug-ins from companies like Fabfilter, iZotope, Voxengo, PSP, DMG, or Brainworx, among others.
Using a ceiling of -0.3 is a good place to start. Streaming platforms recommend a ceiling of -1.0 or even -2.0, but that’s a topic for another article.
Increase the gain/input until the limiter is just barely doing any gain reduction. This is done to get the song closer to the final level as you work on the other processing.
At this point you want to be working at a moderate listening level, not too loud, not too quiet, though perhaps a little on the louder side of moderate.
Note: if you want to meet the precise peak level recommendations given by the streaming platforms you might need a third-party plug-in that offers true-peak limiting. True peak refers to the actual peak level that’s output as the signal is converted from digital to analog. Not all DAW’s stock brickwall limiter includes this feature. That said, many high level mastering engineers do not worry about the precise specs and far exceed the recommended levels.

EQ
A stock parametric EQ will be just fine here. The goal at this point is to make broad adjustments to the overall tonality of the song as needed. Is it too bright? Too boomy or muddy?
If you need to boost by more than 3-4 dB for anything other than stylistic or creative reasons, you should consider revisiting the mix and addressing individual sounds there. Most commonly the kick or bass are too boomy, or the cymbals or high hats are too bright or dull, or the vocal is too loud or quiet. So go back into the mix and adjust EQ and/or volume faders for those specific sounds.
Reducing annoying harsh frequencies with precise high Q cuts is also common at this point in many genres.
Compression
Compression is rarely used to control peaks in mastering as with mixing. Here compression is primarily used to add weight, punch, impact, or “glue” or to enhance a groove.
Most modern productions are already heavily compressed so it’s not uncommon to see only 0.5 to 2 dB or so of gain reduction. A ratio of 2:1 is pretty standard as a starting point.
Use the sidechain filter so the compressor doesn’t mainly react to low frequencies – e.g. so that every time the kick hits the whole mix doesn’t seem to duck.
The attack and release settings need to match the feel of the song. Over-compress the song by pulling the threshold down to get quite a bit of gain reduction. Then adjust the attack and release until you like how the compressor is working with the music. Back off on the threshold and dial in the amount of compression that makes sense for the song.
Disable any auto makeup gain features. Try to manually match the level with the makeup gain control so you can better compare the compressed and uncompressed signal.
Final Limiter Tweaks
Revisit the limiter to find the right amount of limiting that gives you the loudness you want but without damaging the sonic quality of the song. If you can’t get it close to your loudness target without the limiter destroying the mix, it’s likely that the mix itself needs to be revisited.
The first stock processor you will want to upgrade for mastering is going to be the limiter. The good 3rd-party mastering limiters will allow you to push them much harder with significantly less negative artifacts than the stock brickwall limiters that come with nearly every DAW.
Intermediate Mastering Chain
Here is an example of a common intermediate level mastering chain:
Saturation – EQ 1 – Compressor – EQ 2- Width – Clipper – Brickwall Limiter

The first EQ, compressor, and brickwall limiter are approached as with the basic mastering chain – start and end with the limiter.
Saturation
Adding some tape, transformer, or tube saturation can create additional perceived loudness while adding character, warmth, density, or grit as makes sense for the song. Saturation can also do subtle compression and help sculpt the tonality of the song allowing the subsequent EQ, compressor, and limiter to do less work.
EQ 1
Same approach as with basic chain – focused on general tonal adjustments.
Compressor
Same approach as with basic chain.
EQ 2
The idea behind using a second EQ after the compressor is two-fold. First, if a number of surgical notches or other “fix” moves are needed it is simply easier in terms of workflow to use a second EQ, so the first EQ is only used for tone adjustments. Second, sometimes it is desirable to add in some high frequencies after the compressor to make sure that the master has “air” or feels “open” in the final result.
Width
Sometimes a mix benefits from a wider stereo image. Other times, when mono compatibility is important, narrowing the stereo image can help the master better translate on a wider variety of systems.
Clipper
While it may sound counterintuitive at first, using a hard clipper correctly is actually more transparent than using a limiter for dealing with certain transients. By shaving off these very short duration peaks the clipper creates more headroom and allows the limiter to add more gain and also do less gain reduction. Using clippers correctly is key to creating a louder master in the most transparent way possible.
The goal here is to only clip as much as is transparent. If you clip too much you will add audible distortion that most likely will not be desirable. But you can play around with the distortion to get useful harmonics in some cases, especially with more aggressive and distorted styles and genres.
In the example here I’m using the excellent and very affordable GMaudio Clipper 2, which only works with Ableton Live with Max For Live. In my professional mastering work I tend to use Kazrog KClip 3. Some free options worth checking out are Venn Audio’s Free Clip and Airwindows ADC Clip 7.
Limiter
Same approach as with basic chain.
WTF are LUFS?
There are many ways to measure audio levels. The most common being peak level, RMS level, and LUFS. Each of them is important and useful for different reasons.
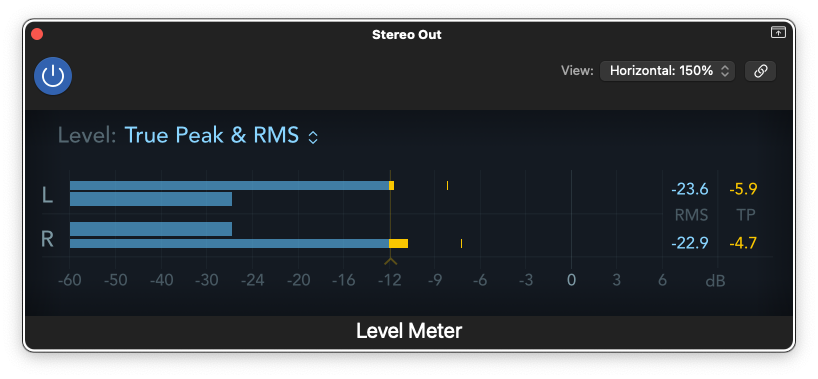
Peak measures the actual instantaneous maximum level.
Peak level is a critical measurement to make sure there is not clipping or unwanted distortion when converted to a lossy codec for streaming. Peak is not a good measurement of loudness.
RMS measures an average of the signal over a duration of time, e.g. 300 ms.
RMS level is much better at measuring loudness than is peak, but is still not very good at it.
Loudness is a perceptual concept that takes into account numerous factors, including average levels, but most importantly also frequency content. Our ears are more sensitive to mid and upper mid frequencies than low or very high frequencies. A violin will sound much louder than a sub bass measured at the same peak and RMS, in most cases.
LUFS stands for Loudness Units in reference to Full Scale. It is the measurement used by all of the streaming platforms as they attempt to normalize all audio to a similar or maximum loudness when played back on their platform.
LUFS utilizes a filter to boost highs and reduce lows so it gives a measurement closer to how we perceive loudness. It is far from perfect but it is the best widely implemented industry standard that we have at the moment.
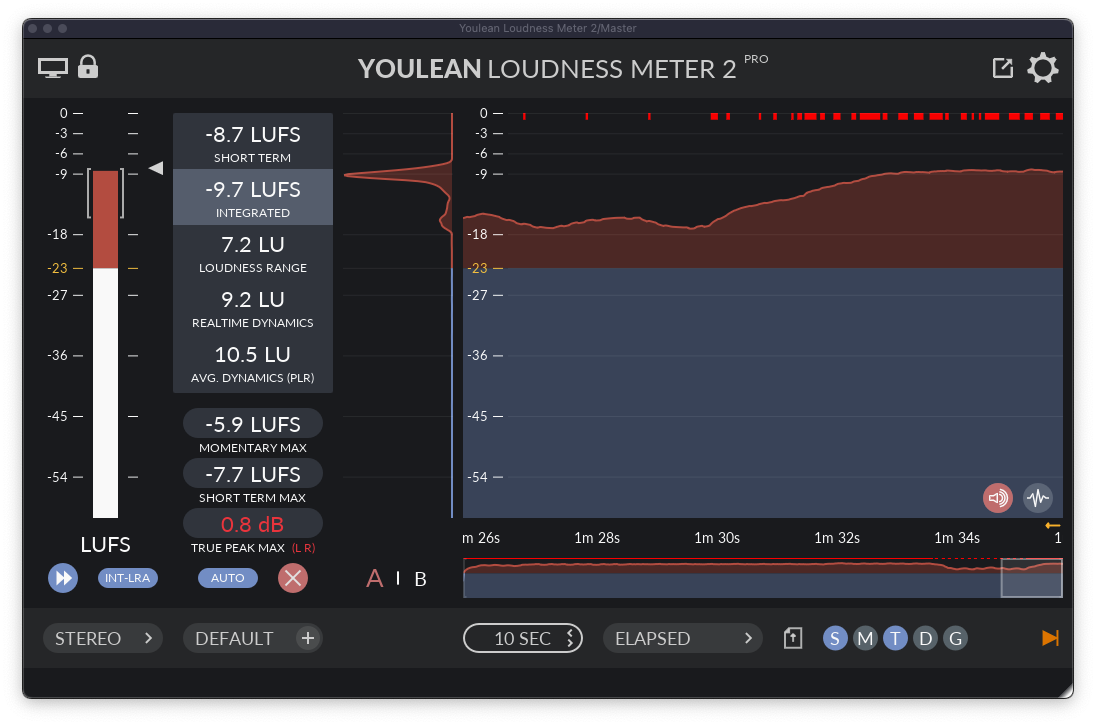
There are 3 LUFS measurements: momentary, short-term, and integrated. All of them are average measurements:
Momentary = 400ms
Short-term = 3000 ms
Integrated = the entire song.
Integrated LUFS is the measurement used by the streaming platforms.
It is the integrated measurement that you need to use for your target loudness.

For example, Spotify recommends -14dB integrated LUFS with a true peak of either -1.0 or -2.0 (depending on whether your master is quieter or louder than -14 dB). While Apple recommends -16 LUFS. There’s no way to meet all of the various platform’s recommendations at the same time, and it doesn’t make sense to do a different master for each one. So most high level mixing and mastering engineers just do what sounds best for their artist and for the genre.
Loud genres commonly measure at -6.0 LUFS and have true peaks above zero, while more dynamic genres with conservative masters come in at -12 to -15 LUFS with true peak of -1.0. In most cases you really just want to make sure they don’t turn you up into their limiter, so make sure that you are above -14.
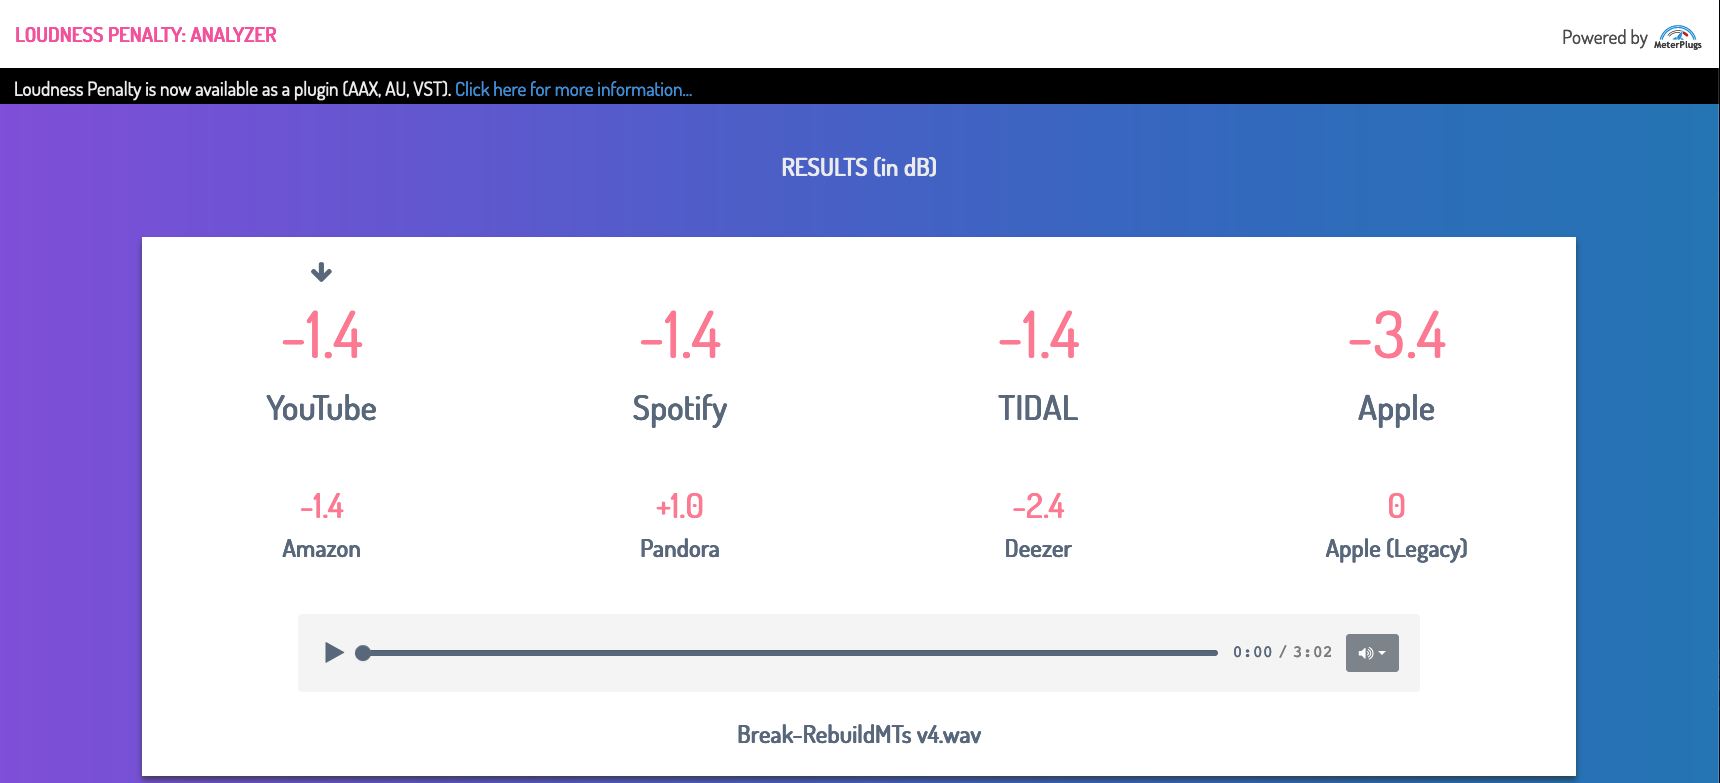
If your DAW doesn’t include LUFS or true peak meters, fortunately, there are free tools to help you out. Check out the Youlean Loudness Meter plug-in and also the Loudness Penalty website. The latter will tell you how much each platform will turn your song up or down.
Dither and Exporting
Dither is purposely added low level broadband random noise that is added to the signal when reducing the resolution of audio. It is a tradeoff between noise and distortion.
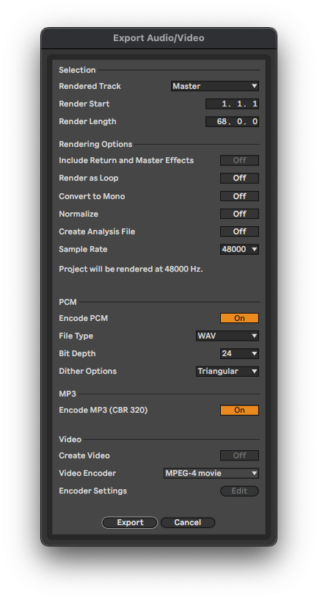
In plain English: when you lower the bit depth you add dither. Your DAW’s audio engine functions minimally at a 32 bit resolution. So when you export your master to 24 or 16 bit you add dither. In most DAWs, dither selection is an option presented to you in the export/bounce dialog box. In a few cases you add dither with a plug-in (e.g. Pro Tools).
It’s important to not add dither too many times, so when exporting a mix it’s ideal to use 32 bit – making dither a non issue. If exporting your mix to 24 bit for some reason you don’t have to add dither, but some people do. If you’re not sure what to do, talk to your mastering engineer. When mastering your own music just keep everything at 32 bit until the final export of your mastered song.
When exporting your master to 24 bit you probably should add dither. When exporting to 16 bit you absolutely need to add dither. In most cases most any dither you pick will be fine – triangular or POW-r 1 are pretty safe. As you learn more about mastering you can dive deeper into the difference between various dither algorithms and when the one you pick might be noticeable.
Realistic goals
Learning how to mix and master your own music requires patience. It takes a lot of practice and experience to get good at each of them. Many producers don’t even bother trying to master their own music because they know a pro will offer a perspective they don’t have, and ultimately create a better final result.
But, knowing how to master your own music is a valuable skill to have even if you are going to rely on professional mastering engineers in key situations.
There are a few maxims to keep in mind:
The better the mix the better the master.
The closer the mix is to the desired final product the better the master.
Conclusion
Do you want to master your own music or do you think it’s best left up to the pros?
As you can see there are a lot of things to consider when deciding to master your own music.
You can start simple and work up to more advanced knowledge and workflows with time and practice.
This article was but a brief introduction to the topic. If you want to go deeper into all of the above topics consider taking our mixing and mastering course in NYC, Berlin, or online.
About the author:
Brian Jackson is an Ableton Certified Trainer, audio engineer, music producer, composer, and educator based in Brooklyn, NY. He is the author of The Music Producer’s Survival Guide: Chaos, Creativity, and Career in Independent and Electronic Music (Routledge, 2018), and works as a mastering engineer for independent artists. He teaches Ableton Live and Mixing and Mastering at 343 Labs in NYC.


